Remote Teleop
dimTELE is hosted teleoperation for dimOS robots: operate them remotely from any browser or Quest headset over WebRTC. The robot dials out to a hosted broker (api.dimensional.org), so you don't need to open any inbound ports on the robot's network. It works behind a home router, on Wi-Fi, wired LAN, or cellular.
How it works
There are three pieces: the robot, the broker, and the operator's browser. You never connect to the robot directly.
- The robot dials out. When you run a
teleop-hosted-go2-*blueprint, the robot opens an outbound WebRTC session to the broker and registers itself. Because the robot initiates the connection, no inbound ports or port forwarding are needed. It works from behind any NAT. - The broker bridges the session. It sits between the robot and the operator, relaying video, the minimap, telemetry, and your commands. It also handles login and decides which operators may connect to which robots.
- You connect from the browser. Open the console, pick your robot, and click Connect. The browser pulls the robot's video track and opens the command/telemetry data channels back to it.
Once connected, four streams flow continuously:
| Stream | Direction | Carries |
|---|---|---|
| Video | robot → operator | The selected camera, composited into one live track |
| Minimap | robot → operator | Occupancy grid + robot pose for click-to-navigate |
| Telemetry | robot → operator | Battery, posture, link latency/rate for the HUD |
| Commands | operator → robot | Drive input, sport commands, nav goals, E-STOP |
All broker-facing modules share a single broker session, so there's exactly one video track and one control plane per robot. See How it connects for the channel-level detail.
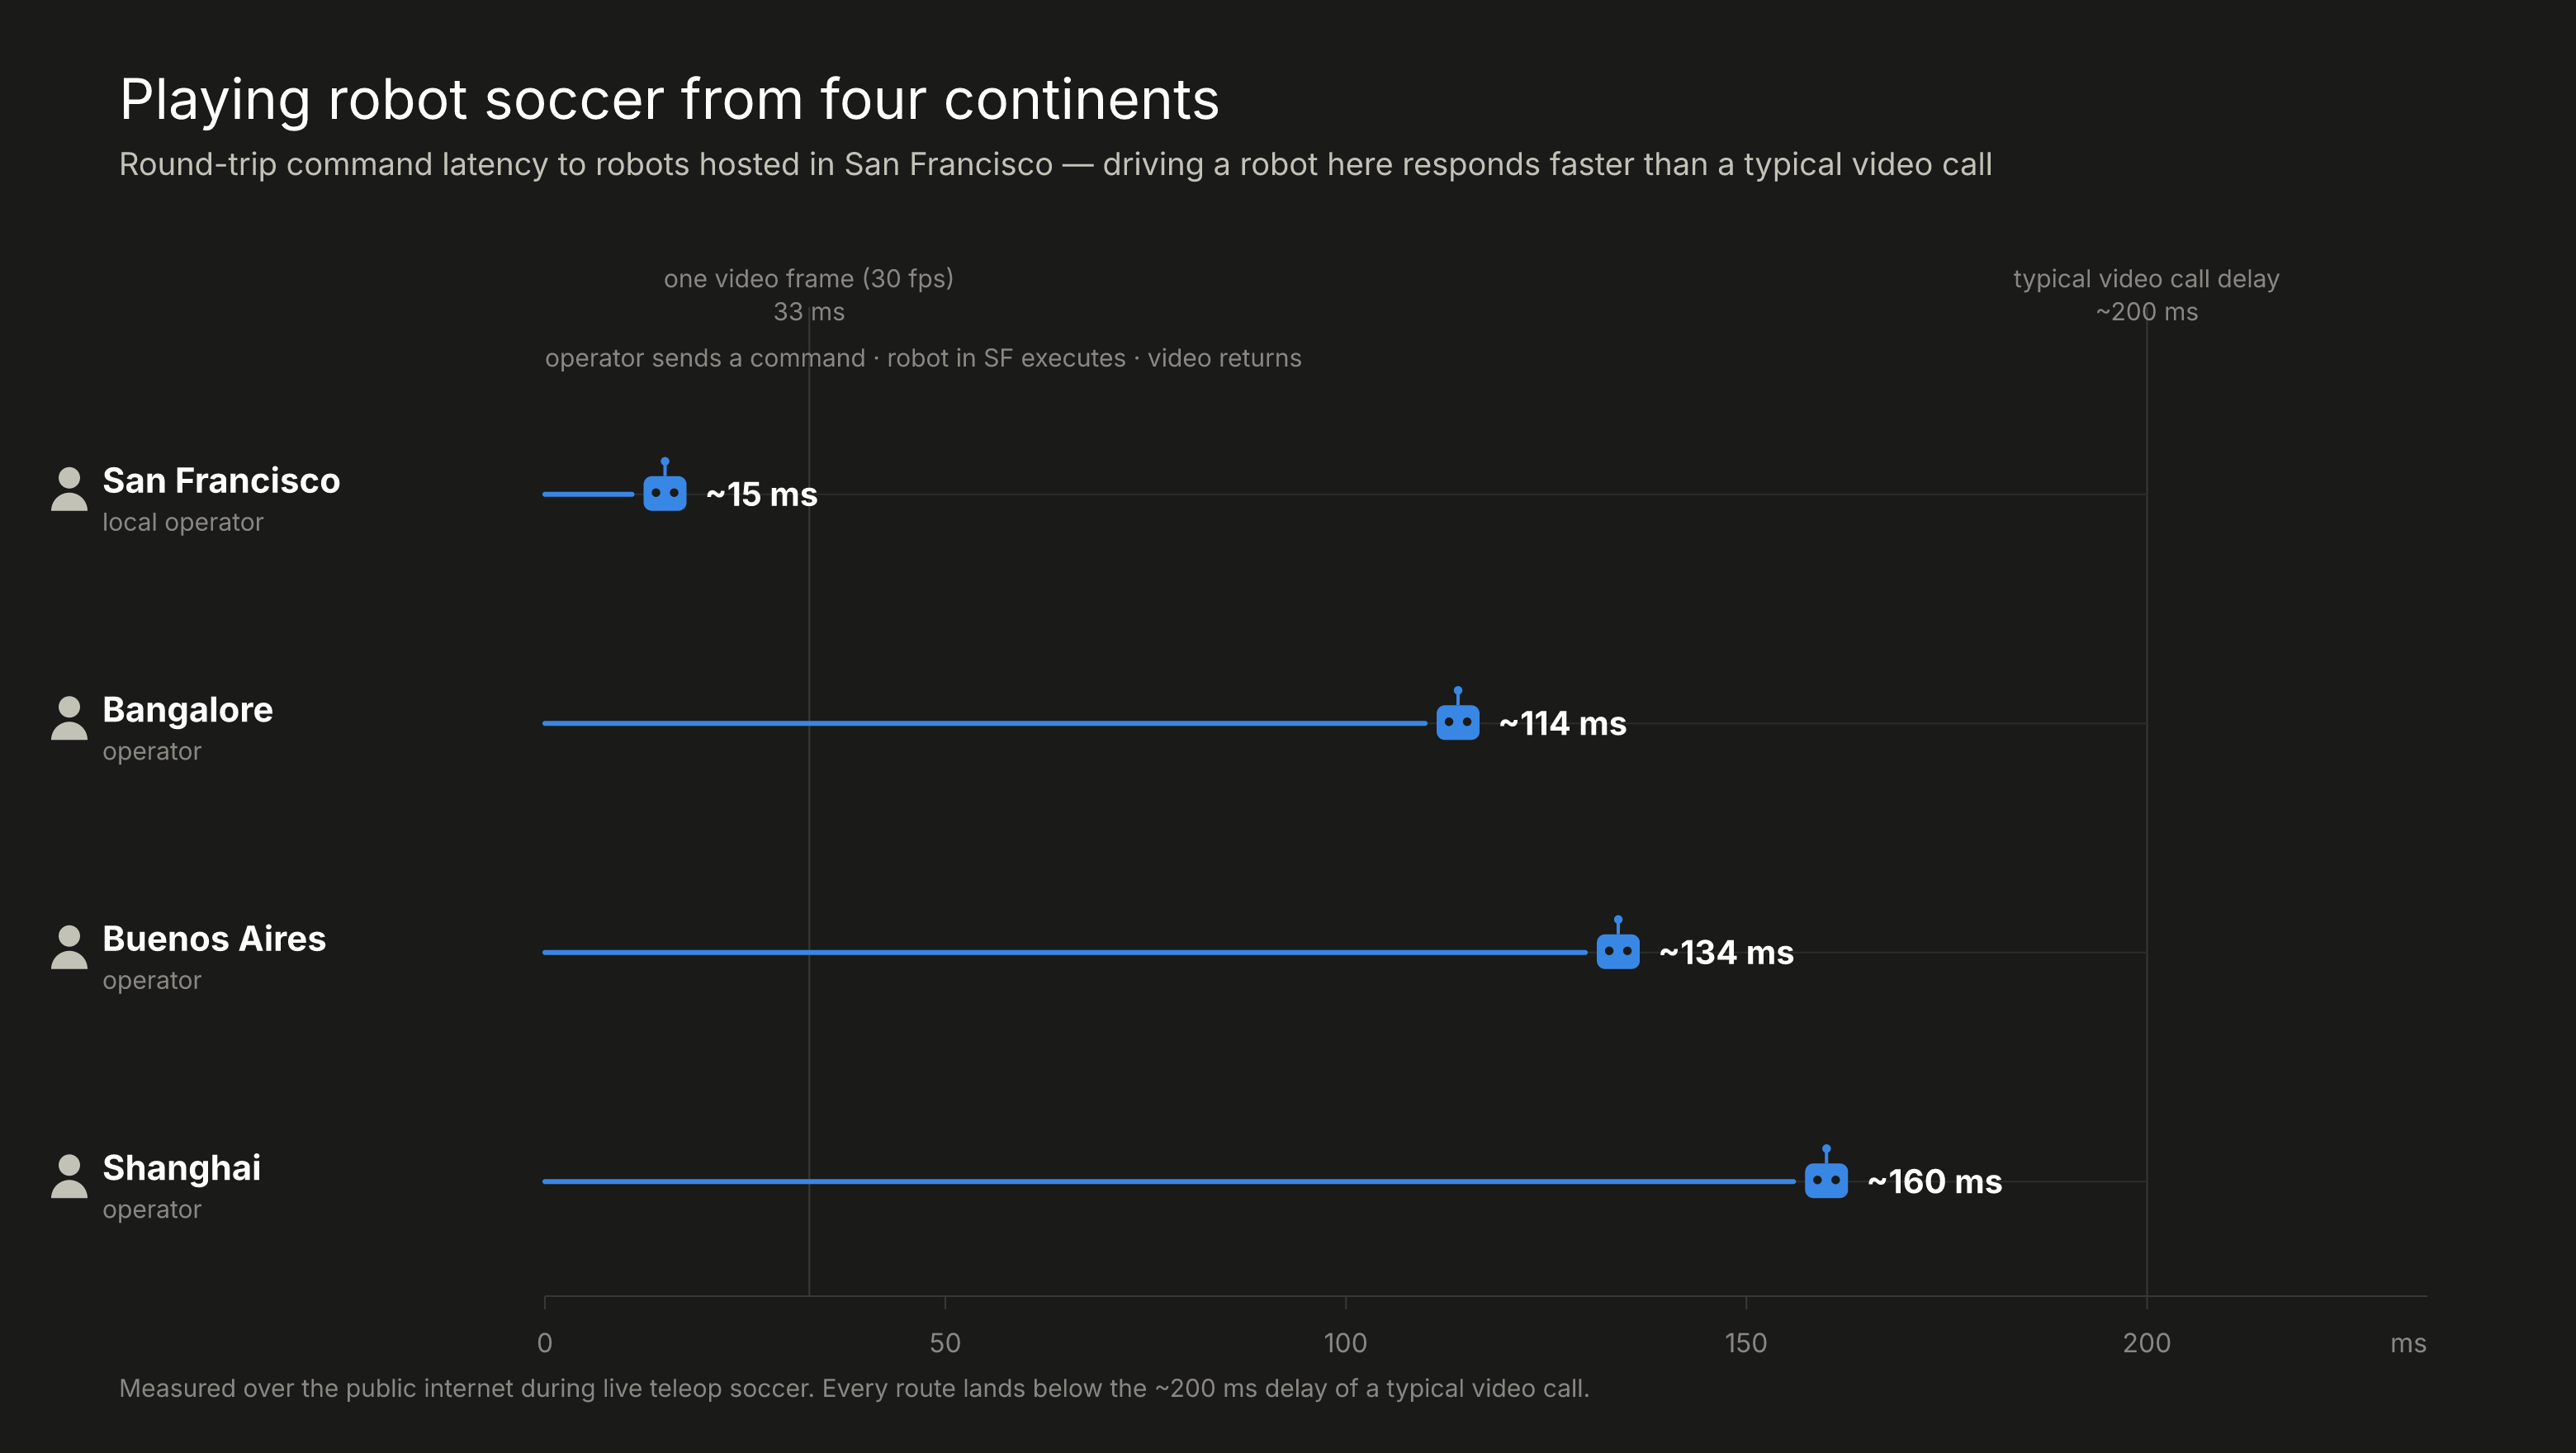
How low is the latency in practice? With the World Cup on, four Dimensional teammates across the globe; San Francisco, Bangalore, Buenos Aires, and Shanghai played soccer with Go2s hosted in SF, over the public internet.
Below are the latencies recorded:
Quick Start
The robot registers with the broker. Open the console Teleop tab, sign in, and your robot appears under Available Robots. Click Connect and you're driving.
The API key alone is enough; one key drives the CLI, uploads, and teleop. By default, the broker derives the robot identity from the API key. TRANSPORTS__BROKER__ROBOT_ID / TRANSPORTS__BROKER__ROBOT_NAME are optional overrides. All broker settings can also be passed on the CLI, e.g. --transports.broker.api-key=dimos_sk_....
Get an API key
- Sign in to the Dimensional console.
- Under API keys, click Create key.
- Copy the key (shown once) and pass it as
TRANSPORTS__BROKER__API_KEY.
Available blueprints
| Blueprint | Notes |
|---|---|
teleop-hosted-go2-transport | Drive + camera + minimap + click-to-nav (recommended) |
teleop-hosted-go2-multicam | Adds a second RealSense, operator-selectable, mux'd into one video track |
The transport blueprints bind Cloudflare* transports directly to the streams of several small, per-concern modules: Go2CommandModule (command / E-STOP / drive guard), CameraMuxModule (camera → video track), MapCompressModule (costmap → minimap), and HostedStatsModule (telemetry + acks). The broker-bound modules run in one worker so they share a single broker session; the GO2Connection driver runs in a second worker (n_workers=2).
Enable the glass-to-glass latency benchmark with --latency-stamp=true.
Operating the robot
Once the robot is running and you've clicked Connect, here's how to operate it.
1. Connect
Open the console Teleop tab, find your robot under Available Robots, and click Connect. Video appears once the WebRTC session negotiates; the metrics HUD starts populating once telemetry arrives. If the robot doesn't show up, confirm the blueprint is still running and that the API key matches the one the robot registered with.
2. Drive
Use WASD on a desktop keyboard (or the thumbsticks in VR) to drive: W/S forward/back, A/D strafe, and turn with the yaw controls. Hold Shift for 2× speed, Ctrl for half speed. Drive input streams continuously and stops the instant you release. The robot treats a released key as "stop," so it never keeps coasting on a dropped packet.
3. Navigate with the minimap
The minimap shows the robot's costmap and live pose. Click any point on it to send a navigation goal. The robot plans a path and drives there on its own, avoiding obstacles. Give a manual drive command at any time and it takes over immediately, cancelling the plan. There's also a cancel control to stop navigating without driving manually.
4. Postures and commands
The command bar exposes the robot's allow-listed actions:
- Stand / sit / recover:
RecoveryStand,StandDown,Sit, andDamp(relax the joints). - Greetings / stretch:
Hello,Stretch. - Acrobatics:
FrontJumpandFrontPounce, only available when the robot was launched with--allow-acrobatics=true. - Obstacle avoidance: toggle the onboard avoidance layer on or off.
- Rage mode: toggle the high-agility gait on or off.
- Head LED: set the head light brightness.
- Camera: on multicam robots, pick which camera (or side-by-side view) the video track shows.
Each command is acknowledged, so the UI reflects what the robot actually did, not just what you clicked.
5. E-STOP
The E-STOP control is always available. It immediately stops all motion, cancels any active navigation, and damps the robot. It takes priority over everything else in flight. Clear it with estop_clear (or the equivalent control) when you're ready to resume; the robot won't move again until you do.
Operator inputs
The browser is modality-agnostic. It streams whatever the device gives it and the robot blueprint decides what to do with it.
| Device | Input | Maps to |
|---|---|---|
| Desktop browser | WASD keyboard | TwistStamped → cmd_vel |
| Quest 3 / VR headset | Left thumbstick Y → fwd/back, X → strafe; right thumbstick X → yaw; grip = boost/slow | same TwistStamped path as keyboard |
Shift = 2× speed, Ctrl = ½×. The operator can also send allow-listed sport commands (StandDown, RecoveryStand, Sit, Damp, Hello, Stretch, plus FrontJump and FrontPounce when allow_acrobatics is set), toggle obstacle avoidance / rage mode / the head LED, pick the camera, E-STOP, and click the minimap to navigate.
Live metrics HUD
While connected, the operator sees a metrics overlay, color-coded on video and command-plane health:
| Metric | Source |
|---|---|
fps, bitrate, loss, jitter buffer, decode time, freezes | Operator's getStats() on the inbound video track |
e2e latency (glass-to-glass) | Frame-embedded capture-time stamp, decoded operator-side (needs latency_stamp=true) |
RTT | NTP-style min-RTT clock sync over the reliable datachannel |
cmd latency, jitter, rate | Robot-measured over the inbound command wire, sent back on state_reliable_back |
Pair with the recorder to log a session and emit a stats report:
This writes recording_teleop_<ts>.db + a report_<ts>.json on disconnect; regenerate from an old .db with python -m dimos.teleop.utils.report path.db.
Configuration
Each concern is its own module, so its commonly-tuned fields live under that module's config key (module class name, lowercased). Pass a unique field directly, for example --telemetry-hz=5; if a field is ambiguous, qualify it with the module key, such as --hostedstatsmodule.telemetry-hz=5.
hostedstatsmodule (HostedStatsModule):
| Field | Default | Notes |
|---|---|---|
telemetry_hz | 3.0 | Robot → operator HUD push rate |
go2commandmodule (Go2CommandModule):
| Field | Default | Notes |
|---|---|---|
cmd_stale_after_sec | 0.5 | Drop cmd_vel older than this |
max_linear_mps / max_angular_rps | 1.5 / 2.0 | Robot-side clamp on operator drive |
max_nav_goal_m | 100.0 | Reject click-to-nav goals farther than this |
allow_acrobatics | false | Gate FrontJump / FrontPounce etc. |
damp_on_operator_lost | false | Damp the robot when the operator link drops |
cameramuxmodule (CameraMuxModule):
| Field | Default | Notes |
|---|---|---|
latency_stamp | false | Paint the glass-to-glass timestamp strip |
video_max_width / video_max_fps | 0 (source) | Publish-side caps for constrained uplinks |
cameras | ["cam1","cam2"] | Named inputs; first is the boot default view |
mapcompressmodule (MapCompressModule):
| Field | Default | Notes |
|---|---|---|
map_hz / odom_hz | 2.0 / 15.0 | Minimap grid + robot-pose push rates (0 = off) |
map_min_resolution | 0.1 | Coarsen finer occupancy grids to this m/cell before encoding for the minimap |
Broker settings live under transports.broker.*: api_key (required), broker_url, robot_id, robot_name ("robot" default), stun_url, and video_codec (e.g. h264/vp8).
How it connects
The per-process BrokerProvider owns the session; blueprint transports bind to it. Channels:
robot                          broker (Cloudflare)                operator browser/Quest
─────                          ───────────────────                ──────────────────────
  POST /api/v1/sessions  ───►  session + datachannels     ◄───    operator joins
  cmd_unreliable        ◄────  (operator → robot, lossy)  ◄────    WASD / Joy
  state_reliable        ◄────  (operator → robot, json)   ◄────    ping, video_stats, estop
  state_reliable_back   ────►  (robot → operator, json)    ────►   pong, robot_telemetry, cmd_ack
  map_unreliable        ────►  (robot → operator, lossy)   ────►   minimap grid + odom
  video track           ────►  broker publishes + pulls    ────►   <video> sink
For the broker session, datachannels, and reconnect behavior, see dimos/teleop/hosted/README.md.