Quality-Based Stream Filtering
When processing sensor streams, you often want to reduce frequency while keeping the best quality data. For discrete data like images that can't be averaged or merged, instead of blindly dropping frames, quality_barrier selects the highest quality item within each time window.
The Problem
A camera outputs 30fps, but your ML model only needs 2fps. Simple approaches:
sample(0.5)- Takes whatever frame happens to land on the interval tickthrottle_first(0.5)- Takes the first frame, ignores the rest
Both ignore quality. You might get a blurry frame when a sharp one was available.
The Solution: quality_barrier
import reactivex as rx
from reactivex import operators as ops
from dimos.utils.reactive import quality_barrier

# Simulated sensor data with quality scores
data = [
    {"id": 1, "quality": 0.3},
    {"id": 2, "quality": 0.9},  # best in first window
    {"id": 3, "quality": 0.5},
    {"id": 4, "quality": 0.2},
    {"id": 5, "quality": 0.8},  # best in second window
    {"id": 6, "quality": 0.4},
]

source = rx.of(*data)

# Select best quality item per window (2 items per second = 0.5s windows)
result = source.pipe(
    quality_barrier(lambda x: x["quality"], target_frequency=2.0),
    ops.to_list(),
).run()

print("Selected:", [r["id"] for r in result])
print("Qualities:", [r["quality"] for r in result])
Image Sharpness Filtering
For camera streams, we provide sharpness_barrier which uses the image's sharpness score.
Let's use real camera data from the Unitree Go2 robot to demonstrate. We use the Sensor Storage & Replay toolkit, which provides access to recorded robot data:
from dimos.msgs.sensor_msgs.Image import Image, sharpness_barrier
from dimos.utils.testing.replay import TimedSensorReplay

# Load recorded camera frames (bundled test data path)
video_replay = TimedSensorReplay("unitree_go2_bigoffice/video")

# Use stream() with seek to skip blank frames, speed=10x to collect faster
input_frames = video_replay.stream(seek=5.0, duration=1.4, speed=10.0).pipe(
    ops.to_list()
).run()

def show_frames(frames):
   for i, frame in enumerate(frames[:10]):
      print(f"  Frame {i}: {frame.sharpness:.3f}")

print(f"Loaded {len(input_frames)} frames from Go2 camera")
print(f"Frame resolution: {input_frames[0].width}x{input_frames[0].height}")
print("Sharpness scores:")
show_frames(input_frames)
Loaded 20 frames from Go2 camera
Frame resolution: 1280x720
Sharpness scores:
  Frame 0: 0.351
  Frame 1: 0.227
  Frame 2: 0.223
  Frame 3: 0.267
  Frame 4: 0.295
  Frame 5: 0.307
  Frame 6: 0.328
  Frame 7: 0.348
  Frame 8: 0.346
  Frame 9: 0.322
Using sharpness_barrier to select the sharpest frames:
# Create a stream from the recorded frames

sharp_frames = video_replay.stream(seek=5.0, duration=1.5, speed=1.0).pipe(
    sharpness_barrier(2.0),
    ops.to_list()
).run()

print(f"Output: {len(sharp_frames)} frame(s) (selected sharpest per window)")
show_frames(sharp_frames)
Visualization helpers
import matplotlib
import matplotlib.pyplot as plt
import math

def plot_mosaic(frames, selected, path, cols=5):
    matplotlib.use('Agg')
    rows = math.ceil(len(frames) / cols)
    aspect = frames[0].width / frames[0].height
    fig_w, fig_h = 12, 12 * rows / (cols * aspect)

    fig, axes = plt.subplots(rows, cols, figsize=(fig_w, fig_h))
    fig.patch.set_facecolor('black')
    for i, ax in enumerate(axes.flat):
        if i < len(frames):
            ax.imshow(frames[i].data)
            for spine in ax.spines.values():
                spine.set_color('lime' if frames[i] in selected else 'black')
                spine.set_linewidth(4 if frames[i] in selected else 0)
            ax.set_xticks([]); ax.set_yticks([])
        else:
            ax.axis('off')
    plt.subplots_adjust(wspace=0.02, hspace=0.02, left=0, right=1, top=1, bottom=0)
    plt.savefig(path, facecolor='black', dpi=100, bbox_inches='tight', pad_inches=0)
    plt.close()

def plot_sharpness(frames, selected, path):
    matplotlib.use('svg')
    plt.style.use('dark_background')
    sharpness = [f.sharpness for f in frames]
    selected_idx = [i for i, f in enumerate(frames) if f in selected]

    plt.figure(figsize=(10, 3))
    plt.plot(sharpness, 'o-', label='All frames', color='#b5e4f4', alpha=0.7)
    for i, idx in enumerate(selected_idx):
        plt.axvline(x=idx, color='lime', linestyle='--', label='Selected' if i == 0 else None)
    plt.xlabel('Frame'); plt.ylabel('Sharpness')
    plt.xticks(range(len(sharpness)))
    plt.legend(); plt.grid(alpha=0.3); plt.tight_layout()
    plt.savefig(path, transparent=True)
    plt.close()
Visualizing which frames were selected (green border = selected as sharpest in window):
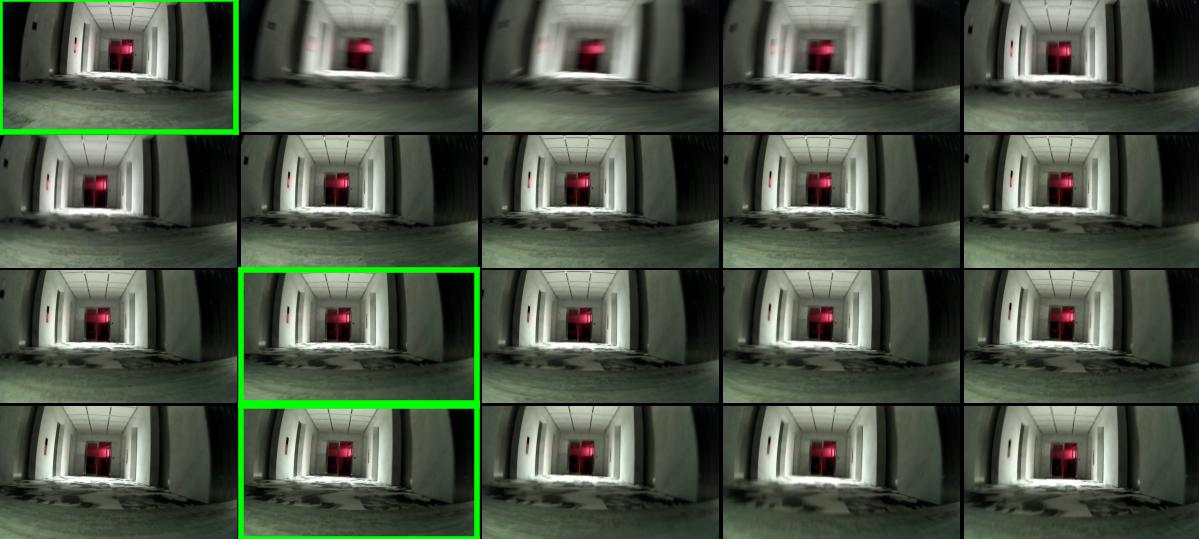
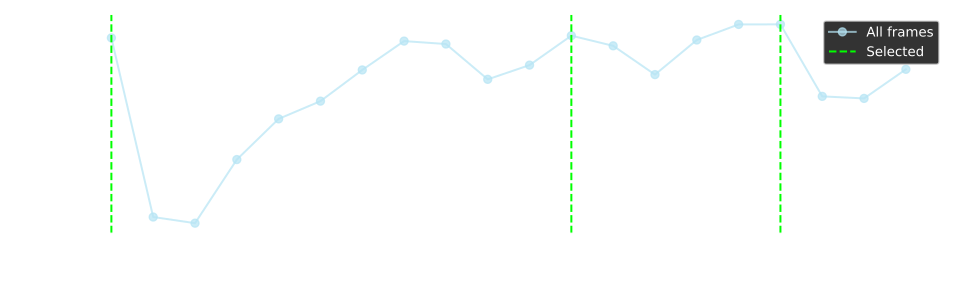
Let's request a higher frequency.
sharp_frames = video_replay.stream(seek=5.0, duration=1.5, speed=1.0).pipe(
    sharpness_barrier(4.0),
    ops.to_list()
).run()

print(f"Output: {len(sharp_frames)} frame(s) (selected sharpest per window)")
show_frames(sharp_frames)
Output: 6 frame(s) (selected sharpest per window)
  Frame 0: 0.351
  Frame 1: 0.348
  Frame 2: 0.346
  Frame 3: 0.352
  Frame 4: 0.360
  Frame 5: 0.329
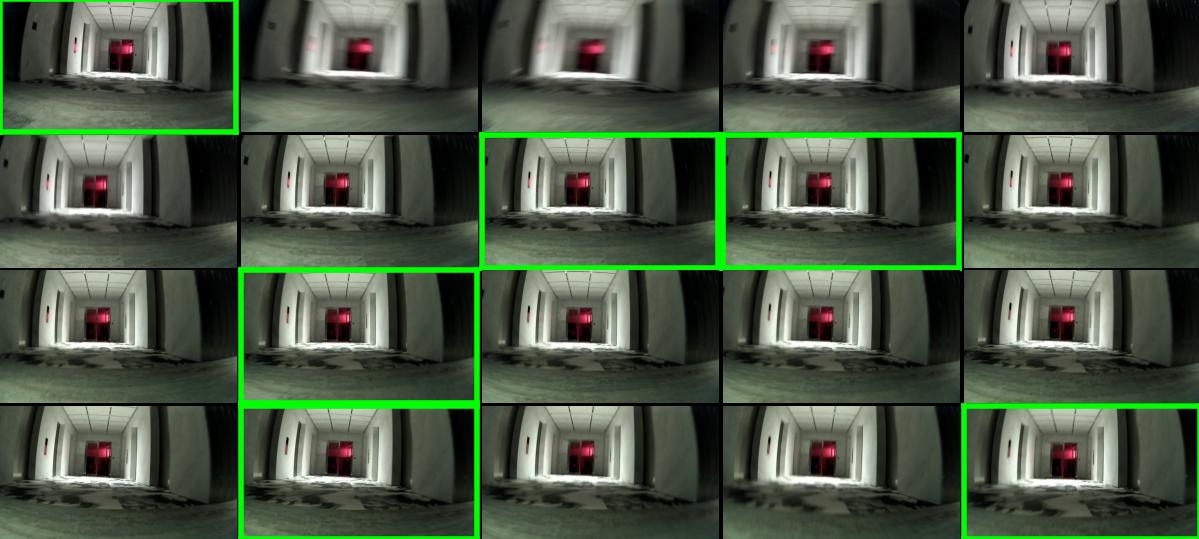
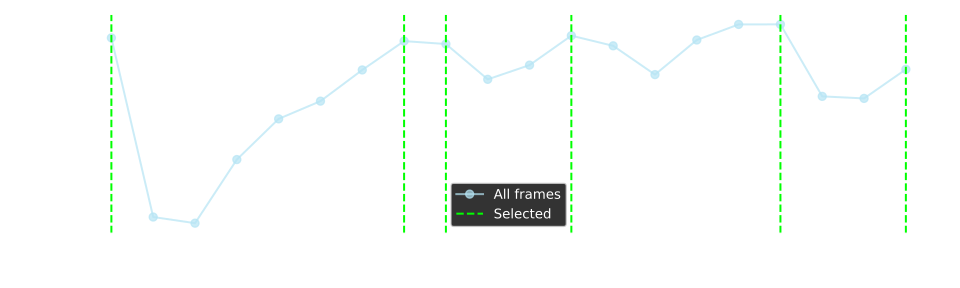
As we can see the system is trying to strike a balance between requested frequency and quality that's available
Usage in Camera Module
Here's how it's used in the actual camera module:
from dimos.core.module import Module

class CameraModule(Module):
    frequency: float = 2.0  # Target output frequency
    @rpc
    def start(self) -> None:
        stream = self.hardware.image_stream()

        if self.config.frequency > 0:
            stream = stream.pipe(sharpness_barrier(self.config.frequency))

        self.register_disposable(
            stream.subscribe(self.color_image.publish),
        )
How Sharpness is Calculated
The sharpness score (0.0 to 1.0) is computed using Sobel edge detection:
from Image.py
import cv2

# Get a frame and show the calculation
img = input_frames[10]
gray = img.to_grayscale()

# Sobel gradients - use .data to get the underlying numpy array
sx = cv2.Sobel(gray.data, cv2.CV_32F, 1, 0, ksize=5)
sy = cv2.Sobel(gray.data, cv2.CV_32F, 0, 1, ksize=5)
magnitude = cv2.magnitude(sx, sy)

print(f"Mean gradient magnitude: {magnitude.mean():.2f}")
print(f"Normalized sharpness:    {img.sharpness:.3f}")
Custom Quality Functions
You can use quality_barrier with any quality metric:
# Example: select by "confidence" field
detections = [
    {"name": "cat", "confidence": 0.7},
    {"name": "dog", "confidence": 0.95},  # best
    {"name": "bird", "confidence": 0.6},
]

result = rx.of(*detections).pipe(
    quality_barrier(lambda d: d["confidence"], target_frequency=2.0),
    ops.to_list(),
).run()

print(f"Selected: {result[0]['name']} (conf: {result[0]['confidence']})")
API Reference
quality_barrier(quality_func, target_frequency)
RxPY pipe operator that selects the highest quality item within each time window.
| Parameter | Type | Description |
|---|---|---|
quality_func | Callable[[T], float] | Function that returns a quality score for each item |
target_frequency | float | Output frequency in Hz (e.g., 2.0 for 2 items/second) |
Returns: A pipe operator for use with .pipe()
sharpness_barrier(target_frequency)
Convenience wrapper for images that uses image.sharpness as the quality function.
| Parameter | Type | Description |
|---|---|---|
target_frequency | float | Output frequency in Hz |
Returns: A pipe operator for use with .pipe()